I have been successfully running a forex robot or EA 24/7 using nothing but my old discarded laptop for quite some time now. This post is created to explain how to setup this auto trading without spending any money on the infrastructure or hosting.
There are multiple ways of doing it. The one explained below is what I have done to setup and run automatic trading (robot trading) using my old windows laptop without spending a single dime.
I had an old laptop with Windows Vista on it and I was not using it anymore. I took that laptop and followed the steps below to setup the auto trading:
Step 1: Check that you meet the pre-requisites
Before you start, you must have an older laptop with a working operating system. Evenif it is not in a good working condition, it is enough to have it at least boot from a floppy disk or a CD or a DVD. Some of the newer laptops boot from a pen drive also. Another most important pre-requisite here is that you need to have a reliable, 24X7, fast internet connectivity. Dial-ups will not work. You need a constant, fast Internet connection. Otherwise the whole effort is a waste.
Step 2: Download Ubuntu operating system image
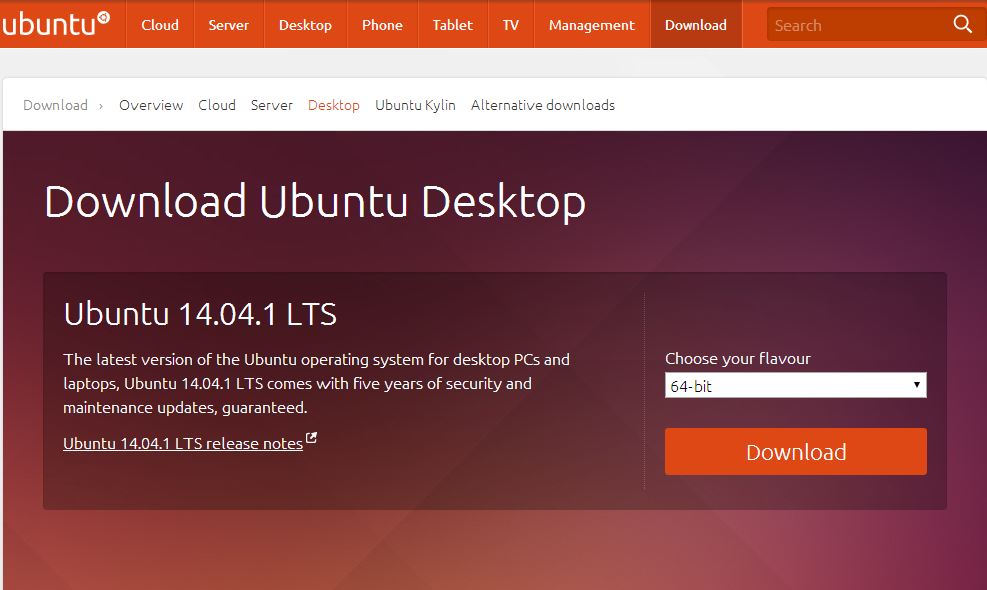
The best part of this is that this OS is free and easily available and even more importantly, most of us corrupted by Windows, it is very easy to install and use. It has the same point and click interface of windows and you need to go to the command prompt very rarely. You can donwload the latest stable version of Ubuntu here – http://www.ubuntu.com/download/desktop (if this link is not working or if they have moved to a new location, just fire up Google search and search for Ubuntu download. The goal here is to get the latest (but stable) version of the Ubuntu image.
Choose the right version applicable for your laptop from the drop-down and click Download.
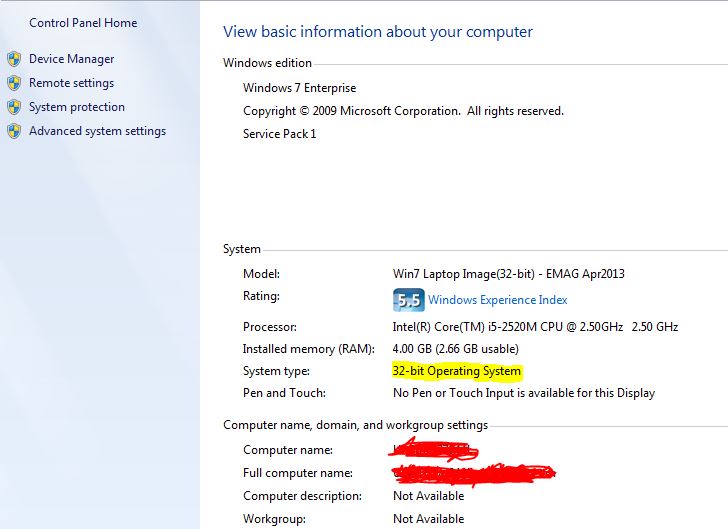
In case you are wondering which flavour you should choose (32-Bit or 64-Bit) just right click on your computer icon on your start menu and go to properties. It will show you what version your laptop is (64-bit or 32-bit).
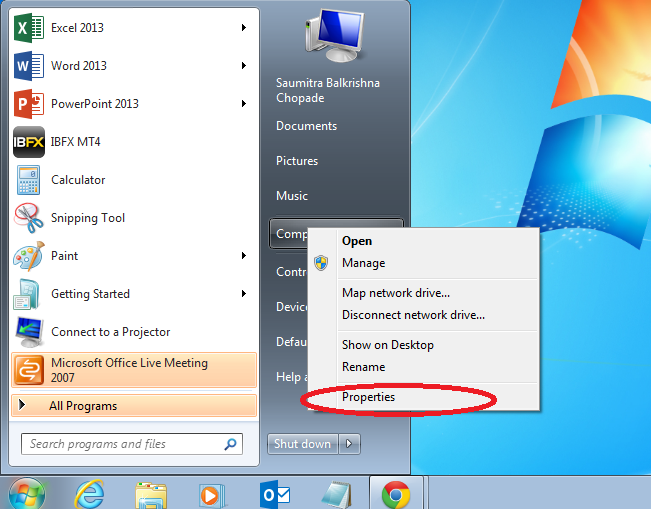
Once you click on the properties button, you will see what version your laptop is running:
Step 3: Create a bootable disk out of the image you downloaded in step 2
I used http://www.pendrivelinux.com to create a bootable pen drive. The exact URL where you can do this is – http://www.pendrivelinux.com/universal-usb-installer-easy-as-1-2-3/
Step 4: Install Ubuntu on your laptop
First thing to do here is to change the boot sequence of your laptop. Put USB drive as the first media to read when your laptop is booting. For this you may have to refer to your laptop’s manual. Here is what was required to be done on my laptop:
- Put the bootable USB drive in the USB drive of the laptop.
- Power the laptop on.
- For a very short time a message comes on the screen saying – Press ESC to go to the boot menu. (this is a bit tricky. you have to be alert. many times this message comes and goes quickly and time given to take action is very short.)
- Once you go to the boot menu, go to boot sequence screen. This also takes some time to figure out if you are not really an expert in these things. This menu is usually Dos-based interface. So you have to figure out how to navigate through this. Usually the instructions to navigate are given at the bottom of the screen.
- Make sure the boot-up sequence has USB drive as the first option.
- Come out of this boot menu.
- Now the laptop will boot from the USB drive where your Ubuntu image is.
From this point on, just follow the instructions to install Ubuntu. It is a bit time-consuming and may take few minutes. Be patient and follow the instructions carefully.
Once your Ubuntu is setup and basic admin account is created, you will be seeing something like this:
Step 5: Install wine
This may sound a bit confusing. Wine here has nothing to do with the favorite alcoholic drink! Wine is nothing but a fantastic interface for Linux-based operating systems to be able to run windows-based applications – like MT4 platform for example.
I must warn you upfront that this can get very frustrating and may need you to be patient, do lot of research before you can get it right. So please do not give up if wine does not get installed on your new Ubuntu machine easily.
Here is what I did:
- Go to the command prompt. It is also called the terminal. Here is the way to access the terminal:
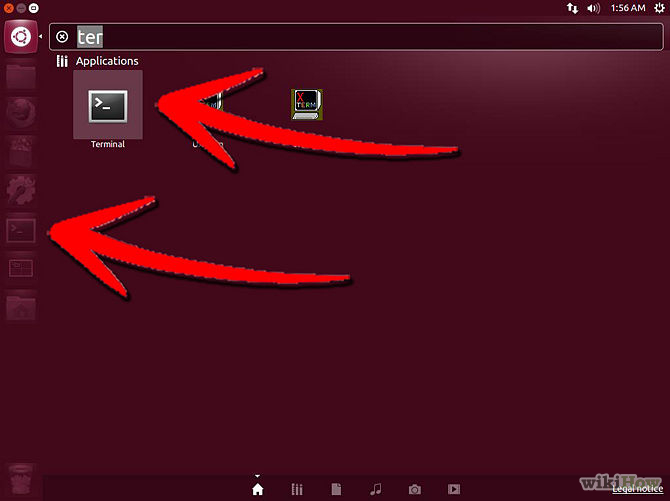
- Once you have the terminal open, type the following command line and hit enter:
sudo apt-get install wine
- This step has been the single most difficult step for me. Every time I tried to install wine, I used to get some error or the other and the installation never completed successfully. I had to research every error and find fixes. I struggled with this for a long time and eventually got to the success message. Unfortunately, there is no one single solution to this. Don’t loose patience if you run into problems. Google is a great resource you have at your disposal. Search the error messages and you will find the solutions.
Once wine is installed, the hard part is over. Now the rest is fairly straightforward.
Step 6: Install MT4
This is just like you would do on any windows laptop. Follow these simple steps if you have not installed MT4 before:
- Open the web browser on your newly installed Ubuntu system (make sure you are connected to the Internet)
- Go to Easy-Forex website.
- Go to the Platforms menu item
- Click on MT4
- Click on Download now and follow the instructions
Once successfully completed, you should see an icon on your desktop.
Step 7: Update system settings to ensure your laptop does not turn off or hibernates automatically
The most critical point of all this is to have your MT4 trading platform run on your laptop continuously without a break. If your laptop hibernates or locks or turns off every few minutes there is no activity, the entire purpose is lost. So here is what needs to be done:
- Go to the top right corner and click on that gear wheel.
- Go to system settings
- Go to power management
- You will see there is option to do nothing when there is inactivity.
- Once this is setup, you are now running a laptop that will never log-out or hibernate unless it is manually asked to do so.
Now at this point, your setup is complete. All you have to do is run your MT4 platform, login to your forex account and setup your EAs to run! Close the lid of your laptop and go to sleep! You are done…
Thanks a lot for reading!!!